
If you're looking to upgrade your shower experience, a rainfall shower head may be the perfect option! This type of shower head can provide a luxurious, relaxing experience that's perfect for winding down after a long day. But how do you go about installing one? Keep reading for tips on how to install a rainfall shower head in your home.
But first, let me offer you some important background information on rain shower heads before we move on to the detailed instructions.
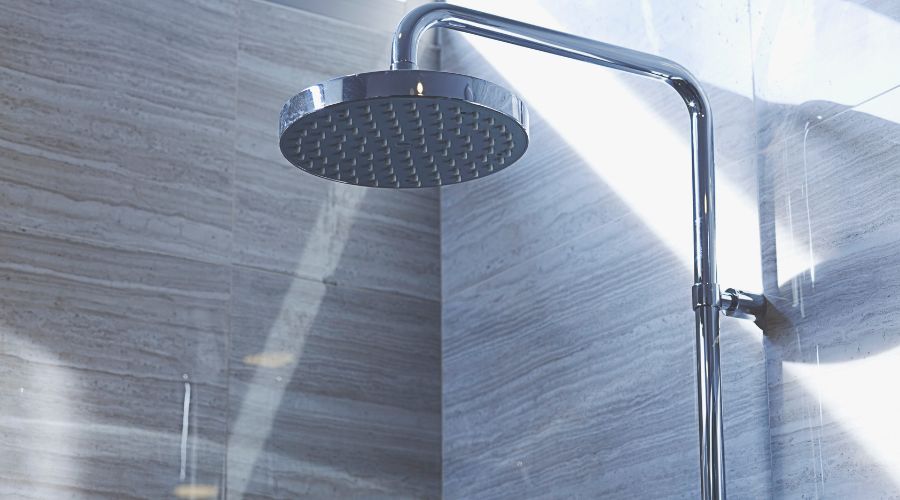
What is a rainfall shower head?
A rain shower head is a type of shower head that is designed to mimick the experience of rainfall.
The rain shower head, as its name implies, distributes water more like a natural downpour. They primarily fall into two categories: wall-mounted and ceiling-mounted. Both of these showerhead types gently spray water downward.
Rain shower heads typically have a wide, flat surface with a large number of small holes. This design allows water to flow evenly and efficiently, creating a gentle showering experience. Rain shower heads are often used in conjunction with other types of showerheads, such as hand-held showers or body sprays. This allows you to customize your showering experience to create the perfect environment for relaxation or invigoration.
These rain showerheads are often composed of metal or chrome, but some are now now constructed of plastic. However, you can choose models with greater finishes that will enhance the elegance of your bathroom based on your preference and budget.
You are now aware of a rain shower! Let’s proceed with learning the simple steps for installing a rain shower head.
How to install rainfall shower heads
The location in which you wish to hang a rain shower is important when it comes to installation. The standard shower head, which is simpler to modify at any time while showering, cannot be adjusted like this one does.
In order for the water to completely cover your body as you shower and rinse comfortably, you must put the rain showerhead above your head.
First, you'll need to gather your supplies:
- Shower Head
- Pre-installed rubber sealing washer
- Safety Goggles
- Terry cloth
- Teflon Tape
- Adjustable wrench or pliers
- High chair or ladder
Once you have everything you need, it's time to get started.
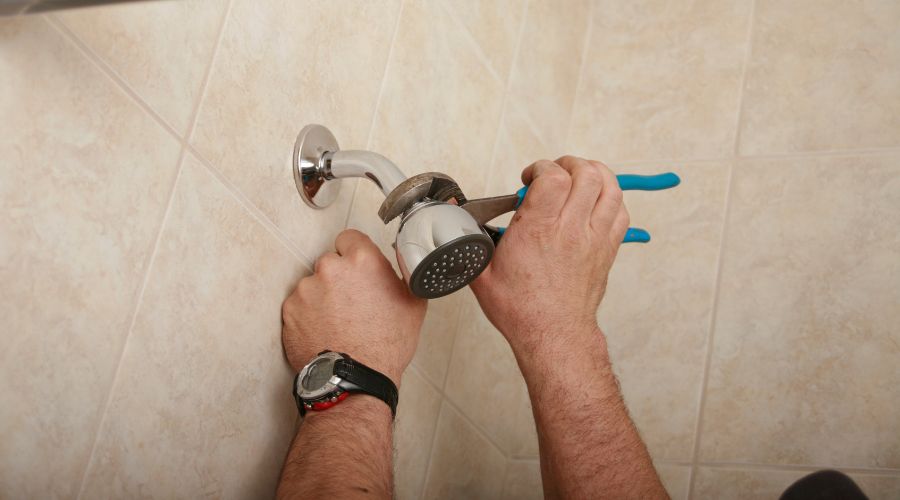
1) Take out the old shower head
It is simple to remove by hand, however you might need to use an adjustable wrench depending on how long the rain showerhead has been put.
So, to detach the showerhead if you find it difficult to do so, turn it counterclockwise with an adjustable wrench.
2) Ensure the shower arm head is clean and in good shape
Check the shower arm threads for debris and worn Teflon tape after removing the shower head.
Remove it and give them a good cleaning if you discover any. When cleaning the thread, a microfiber cloth works best because it effortlessly removes Teflon tape and is excellent at capturing minute grit.
3) Add a new teflon tape
Replace the old Teflon tapes you removed with a new one. Tape around 3-5x (in clockwise motion) on the thread and smooth it out with your hands.
4) Connect the shower head
We're utilizing the rubber washer that seals the showerhead, as was mentioned earlier in the list of necessary items. This device aids in keeping the showerhead waterproof and fastened to the thread. Before installing it, make sure to position it correctly.
Reconnect the shower head after that, then use your hands to tighten it. To make things easier for you, use a chair or a ladder.
5) Tighten the shower head onto the thread
To properly tighten the shower, you'll need to have an adjustable wrench on hand. To prevent damage to the finish when tightening the showerhead, wrap the threads in terry fabric.
Once you've finished, tighten the showerhead with the adjustable wrench. To make it simpler to remove afterwards, don't overtighten or push it, though.
Rainfall shower heads are a luxurious upgrade for any bathroom. Installing one of these shower heads is a relatively simple process that can be completed in just a few minutes. With just a few simple tools and supplies, you can be on your way to enjoying the luxurious feel of rainfall in your own shower.
Keep your bathroom clean!
Remove all of the tools and the cleaning cloth once you have finished installing the showerhead entirely. Get a container or put everything in the shower head's box to store the old stuff. Keep all the pieces out in case another bathroom needs to be repaired or renovated in the future.
To help you clean your showers easier, you can try Rinseroo. It will fit shower heads as wide as 6" in diameter and instantly converts them into a rinsing, bathing and cleaning machine. No install necessary. It slips on and off in seconds. Because a handheld showerhead isn't stuck to the wall, it can make cleaning more accessible than ever.
Learn how to clean your shower with a Rinseroo!
It is great for showers, sinks, tubs, and pets!

